How to Clean Macbook Keyboard – Get Rid of Dander and Dust

How to clean a Macbook keyboard is a question is often asked as there are so many cleaning agents and products available in the market that claim to clean the Macbook keyboard. The question is not what products are good and what products are bad. Do I throw away the Macbook and get a new one? Or do I try to find how to clean the Macbook keyboard most easily and quickly as possible?

clean macbook keyboard

Cleaning your Macbook keyboard does not necessarily require you to spend a lot of money, especially if you can clean the keyboard yourself. You can always replace the keyboard with another, or clean the keyboard through the use of canned air.

However, canned air and other sprays and substances that you can find in your nearest local stores are not the best options for cleaning your Macbook keyboard. As such, here are some things you should know on how to clean the Macbook keyboard.

Steps to cleaning your Macbook keyboard by yourself

First off, we would like to tell you about the best method on how to clean a MacBook keyboard – rubbing alcohol. Rubbing alcohol is an extremely effective cleaner and can get rid of a lot of germs on the keys without causing any harm to your Macbook.

clean macbook-keyboard using rubbing alcohol

Compressed air is also the same as rubbing alcohol, but if you don’t have the cash to buy a bottle of compressed air, rubbing alcohol will do just fine. To use rubbing alcohol, simply pour a small amount on a clean cloth and apply it to the affected areas of the keyboard.

Make sure that you clean all the areas of the keys, including the insides of the keys, because leftover dirt can also cause damage to the actual keys.

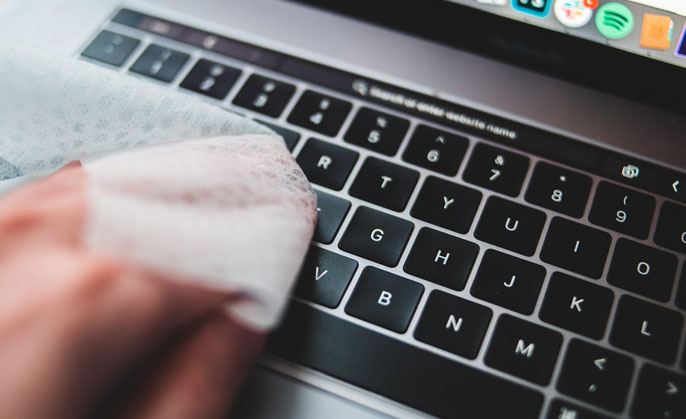
Second, we would like to share with you another method on how to clean the MacBook keyboard – the dry cloth. To do this, you will need a clean piece of cloth and some water. You can wipe your Macbook’s screen with the help of a dry cloth.

However, this cloth will most likely leave traces of dirt on the screen and keys, which will be harder to remove. If you want to effectively wipe your Macbook with a dry cloth, make sure that you clean a clean cloth using a mild detergent or soap, and moisten the cloth slightly before you start wiping.

Third, to clean a Macbook keyboard without causing any damages, you can try to spray it with compressed air. Compressed air has great power when it comes to removing dirt on your keyboard and other parts of your Macbook. However, if the damage is too much for the compressed air to remove, you can try to remove it by hand.

Final words

After all of those methods have been done, you might find that the dust on your Macbook keyboard is so difficult to remove. If this is the case, you can use the vacuum cleaner to suck the dirt off of your Macbook keyboard.

Just turn on the device, move it to a place where there is no air, and start spraying in the direction of the holes on your MacBook housing. Be sure to clean at least three corners of the housing using the vacuum cleaner’s hose.

Disable Blood Flash in Rainbow Six Siege: Easy Steps

Want to turn off the blood flash effect in Rainbow Six Siege? You’ve come to the right spot. We’ll show you how to disable blood flash, making your game play better. First, you need to get into your pc rainbow blood flash settings and tweak a few things.

Knowing how to switch off blood flash on pc rainbow is key for a smooth game play. Our simple steps will guide you through the game’s settings. This way, you can dive into your game without distractions.

Understanding Blood Flash Effects in Rainbow Six Siege

The blood flash feature in Rainbow Six Siege is a visual effect that shows when a player gets hurt or dies. It creates a flash of blood on the screen. Some players like it for realism, but others find it distracting. That’s why many choose to disable blood flash pc rainbow for a better gaming experience.

For better gaming, a 1ms gaming monitor is key. It’s talked about on 1ms gaming monitor for your computer. It highlights the importance of contrast ratio, response time, and ultraviolet light reflection quality. In Rainbow Six Siege, such a monitor can reduce distractions, including the blood flash effect, for better focus.

What is the Blood Flash Feature?

The blood flash feature in Rainbow Six Siege aims to make the game more realistic. But, for some, it’s more of a problem, not a plus, in competitive play. Disabling the blood flash can help players focus better, which might improve their game.

disable blood flash pc rainbow

Impact on Gameplay Experience

Deciding to disable blood flash in Rainbow Six Siege can change a player’s experience. Turning off the blood flash makes the game visuals cleaner and less distracting. This is great for fast games like Rainbow Six Siege. With the right hardware, like a fast graphics card and a sharp display, gameplay becomes smoother and more fun.

Why Players Choose to Disable It

Players disable the blood flash for many reasons. They might prefer a less distracting game, want a competitive edge, or just like it better that way. Disabling the blood flash, along with other tweaks, can make Rainbow Six Siege more enjoyable and strategic.

How to Turn Off Blood Flash on PC Rainbow: Step-by-Step Guide

To stop blood flash in pc rainbow, you need to access the game settings. Start by launching the game and then go to the options menu. There, you can find the display options and adjust the blood flash settings to your liking. This is a simple process if you want to remove blood flash on pc rainbow.

Here are the steps to disable blood flash:

  1. Launch the game and navigate to the options menu.
  2. Locate the display options and click on it.
  3. Adjust the blood flash settings to your preference.

For more information on troubleshooting game issues, you can visit this website to learn how to find save game files on Steam. By following these steps, you can easily stop blood flash in pc rainbow and enjoy a smoother gaming experience.

how to remove blood flash on pc rainbow

Benefits of Disabling Blood Flash Effects

Turning off the blood flash feature in Rainbow Six Siege has many benefits. It can cut down on distractions and help players focus better. This lets them dive deeper into the game. Disabling the blood flash toggle pc rainbow feature makes the game feel more real.

This is great for players who like a more authentic game world.

Some key benefits of disabling blood flash effects are:

  • Improved focus and reduced distractions during gameplay
  • A more realistic and immersive gaming experience
  • Enhanced overall enjoyment of the game, for those sensitive to graphic content

By turning off pc rainbow blood effects, players can make the game their own. This is perfect for those who want to concentrate on strategy and gameplay. With the ability to disable blood flash effects, Rainbow Six Siege becomes a more personalized and fun experience.

pc rainbow blood effects disable

Conclusion: Optimizing Your Rainbow Six Siege Experience

Disabling the blood flash feature on PC Rainbow Six Siege is easy. It makes your game better. Just follow the steps in this guide to change the blood flash settings.

This way, you can enjoy the game more without distractions. Making the game look and feel the way you want it to is key. It makes Rainbow Six Siege more fun and competitive for you.

Customizing your game settings is worth it. It makes you happier as a player. By turning off the blood flash, you can focus better on the game’s tactics.

This helps you get better at Rainbow Six Siege. Personalizing your game can make your experience even better. So, go ahead and make your Rainbow Six Siege experience amazing.

How to Turn Off Noise Suppression on Xbox Game Bar PC

Having the right audio settings is crucial for a great gaming experience. If you want to disable noise reduction xbox game bar, you’re in the right spot. We’ll show you how to turn off noise suppression on Xbox Game Bar PC. This will help you enhance your audio settings for a better gaming experience.

First, let’s talk about why optimizing your audio settings is important. By learning how to disable noise suppression on Xbox Game Bar PC, you can improve your gaming experience. We’ll guide you through the process and give you the tools to enhance your gaming audio.

Understanding Xbox Game Bar’s Noise Suppression Feature

Xbox Game Bar’s noise suppression feature helps cut down background noise. This makes your gaming audio better. To improve your gaming, knowing how it works is key. You can tweak the settings to fit your gaming style, including turning off enhancements.

Using noise suppression can make your voice clearer and reduce echo. But, it might lower audio quality in some cases. It’s important to know when to turn it off and adjust the settings right.

What is Noise Suppression?

Noise suppression cuts down unwanted background noise in audio. It’s great for online gaming and video calls. It makes communication clearer and audio better.

xbox game bar noise suppression settings

Benefits and Drawbacks of Noise Suppression

Noise suppression improves audio quality and reduces distractions. But, it might lower audio quality in some cases. It’s vital to balance the benefits and drawbacks and adjust settings to enhance your experience.

When to Disable Noise Suppression

Disabling noise suppression can be good for games needing precise audio. Turning off enhancements can enhance your gaming. Knowing when to disable it lets you tailor your audio for the best gaming experience.

How to Turn Off Noise Suppression Xbox Game Bar PC: Step-by-Step Guide

To turn off noise suppression on Xbox Game Bar PC, start by clicking the gear icon in the top right corner. Then, go to the audio settings. Look for “Noise Suppression” or “Noise Reduction” to stop it.

Here are the steps to follow:

  1. Open the Xbox Game Bar on your PC by pressing the Windows key + G.
  2. Click on the gear icon to access the settings menu.
  3. Scroll down to the audio settings section and look for the noise suppression option.
  4. Toggle the switch to turn off noise suppression.

You can also adjust audio settings through Windows sound settings. For more info, visit a site that offers troubleshooting tips for issues like a Motorola G 5G phone’s charging port.

By following these steps, you can disable noise suppression on your Xbox Game Bar PC. If you can’t find the option, search online for help or more tips.

how to turn off noise suppression xbox game bar pc

Alternative Methods to Control Audio Settings

There are many ways to change audio settings on Xbox Game Bar PC. Learning how to mute game bar mic noise reduction and disable background noise is key. This helps users get the best sound for their games.

Using Windows sound settings is one way to customize audio. Here, you can tweak microphone and speaker settings. You can also turn noise reduction on or off. This lets users tailor their audio to their liking and enjoy better gaming.

Using Windows Sound Settings

  • Access Windows sound settings through the Control Panel or Settings app
  • Adjust microphone settings to optimize audio input
  • Configure speaker settings to enhance audio output

how to mute game bar mic noise reduction

Third-Party Audio Solutions

Third-party audio tools can also boost your Xbox Game Bar PC’s sound. They offer cool features like noise reduction and echo cancellation. Using these tools, users can make their audio settings even better for gaming.

Conclusion: Optimizing Your Gaming Audio Experience

Follow the steps in this guide to turn off noise suppression on your Xbox Game Bar. This will make your gaming better and your voice clearer during play.

Customizing your audio is key to a great gaming setup. You can get rid of background noise, adjust your mic levels, or try new audio options. The tips in this article will help you make your gaming audio the best it can be.

Don’t accept poor audio quality. Try new things, experiment, and make your Windows 10 gaming setup amazing. Your teammates and viewers will love the clear, sharp sound of your voice, making your gaming even better.

How to Turn Off iMessage Announcements in No Time

To learn how to turn off imessage announcements, you need to know about iPhone settings. You also need to know how to disable imessage alerts. It’s easy if you know where to look. Online guides, like the one on how to easily turn off pop-up blocker on, can help you manage your notifications.

Knowing how to disable imessage alerts can make your iPhone experience better. By turning off imessage announcements, you can cut down on distractions. You can also customize your notification settings to fit your needs. In this article, we will show you how to turn off imessage announcements. This way, you can enjoy a more streamlined notification experience.

Understanding iMessage Announcements and Their Impact

iMessage announcements can be helpful but also frustrating for many. To avoid these pop-ups and enhance your experience, it’s key to know what they are and how they work. By adjusting your notification settings, you can tailor your alerts to fit your lifestyle.

Many users face issues like constant notifications, distractions, and interruptions from iMessage. To turn off these notifications, you can tweak your device’s settings. This makes it easier to stay focused, whether you’re working or studying.

What Are iMessage Announcements?

iMessage announcements pop up when you get a message or a call. They can be handy but also annoying, mainly if you get lots of messages or calls daily.

Common Frustrations with Message Notifications

Some common issues with message notifications include:

  • Constant notifications that can be distracting and interrupt your work or activities
  • Difficulty in customizing notification settings to suit your needs and preferences
  • Receiving notifications for messages or calls that are not important or relevant to you

stop imessage pop-ups

Benefits of Customizing Your Alert Settings

Customizing your alert settings can help you stay focused and avoid distractions. By adjusting your notification settings, you can:

  • Reduce distractions and stay focused on your work or activities
  • Improve your productivity and efficiency
  • Enhance your overall user experience and satisfaction with your device

How to Turn Off iMessage Announcements on Your Device

To stop imessage alerts and prevent announcements, follow a few easy steps. First, open the Settings app and go to the Notifications section. Then, turn off the switch next to “Notifications” to mute imessage notifications.

For a more detailed guide, check out the iMessage user guide. It shows how to customize your notification settings. This will help you turn off imessage alerts and stop announcements on your device.

Here are the steps to follow:

  1. Open the Settings app on your device
  2. Navigate to the Notifications section
  3. Toggle off the switch next to the “Notifications” option to mute imessage notifications

By following these steps, you can easily turn off imessage alerts and stop announcements on your device. This will make your experience more peaceful and distraction-free.

mute imessage notifications

Remember to always adjust your notification settings to fit your needs and preferences. This way, you can stay focused and avoid distractions all day.

Conclusion: Enjoying a Notification-Free iPhone Experience

Turning off iMessage announcements can really improve your iPhone use. By silencing imessage alerts, you get more focus and less distraction. This makes your day more peaceful and productive.

Your iPhone should help you, not the other way around. By adjusting your alert settings, you take back control. This lets you enjoy a notification-free iPhone experience and see how it improves your life.

So, why wait? Go to your settings and turn off those annoying iMessage alerts. You’ll feel more free and focused. Your productivity and peace of mind will thank you.